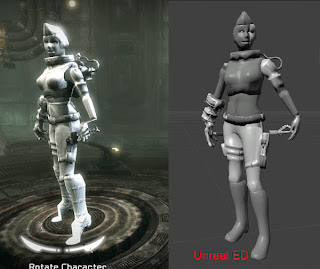
I will fill in some details later, but at the moment I need some help with UT.
Following on from the above comment:
Over the past few days I have been trying to work out what has gone wrong with my character mesh, why does my character mesh work perfectly in Unreal Editor, but in the Unreal game parts of the mesh is out of place.

Another problem is the character is facing the wrong direction ingame even when I change the settings within Unreal Edit (coordinates Z -50,000) the results are still the same.
So at the moment I have been gathering all the information I can find for Unreal Editor and I have been doing some reseach into how this problem can be fixed.
Before I explain what as has gone wrong, here is a breakdown of my workflow up to the point where I was having trouble with the in-game character mesh.
Maya:
1. I created the character in Maya 2008 and separated the mesh into 5 parts (head, torso, arms , legs and boots).
2. Each part has its own name e.g. L_arm, R_arm and so on.
3. Make sure that Maya’s world coordinates are set to Z.
4. Make sure that the centre point of each mesh is in the centre of the grid.
5. Create a rig for my character and move bones to fit inside of the mesh.
6. Freeze transformation to all mesh parts and delete history before Smooth bind all parts to rig.
7. Use the smooth tool to add weights to the correct areas of the mesh and test the mesh by moving the bones of the rig.
8. Save file before deleting each part of the mesh, leaving only the part that will be transferred.
9. Open actor X version 2.47, set output file and name character parts e.g 1Teresa_head.
Unreal Editor:
1. When all of the parts have been imported into a new package with normal and diffuse maps assigned to a material instance constant in Unreal Ed.
2. Set all of the sockets to the correct places.
3. I quickly tested the animation in Unreal ED with default animations “work’s flawlessly”.
4. Open UTCustonChar.ini file and input your character script details.
5. Run Unreal Editor and find character in customize settings.
Okay from reading lots of useful information provided by my tutor/mentor, the internet and not forgetting the Epic community.
One of the main warnings in all of the information was “DO NOT MOVE OR SCALE RIG” in big bold letters.
Yep, I totally messed about with the rig then tried to import it into Unreal and I did this because it was much easier to move the parts of the model then use the smooth weights tool to assign the mesh to the correct places.

This is something I learnt to do in Maya when rigging a character so that when the character bends her leg she will have a nice fold behind her knees.
Also before adding the weights I moved the position of the rig and scaled some parts of the rig into position, unaware that it will cause major problems further down in my production stage.
So why did my mesh work in Unreal editor?
Well I conducted some simple experiments in Unreal Editor to find this out and what I did was import a model with Y coordinates as world up then used a default animation in Unreal ED and
everything worked fine.
Some the information provided did mention that Unreal Editor can show different result in comparison to the Unreal game.
However if this model was imported into Unreal game the character mesh will be under the ground and not visible to the third person camera.

No comments:
Post a Comment