Production Document ( 2nd year )

Production Document ( 2nd year )

Monday 12 April 2010

March 23rd 2010 (Project Finally)

Over the weekend I completed texturing the rest of the head and the body, modeling a character for Maya didn’t take as much groundwork as it did for Unreal.
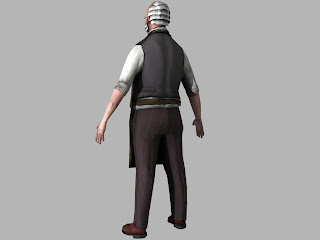
At this point I’m very happy with what I have been producing so far and I have been receiving lots of positive feedback for Vincent. The next thing to do with Vincent is smooth rig him so that he can be used for any future animations or poses for some very nice renders.
After I am happy with the still renders of Vincent the extra content ideas are very open to any possibilities and after this project I will still like to continue making content with the Steampunk theme because I have really enjoyed this project.


April 12 2010 (Workshop)

I have had some time to think about what I would like to do with renders of Vincent and I feel that I may have time to build a workshop scene which was suggest to me by tutors.
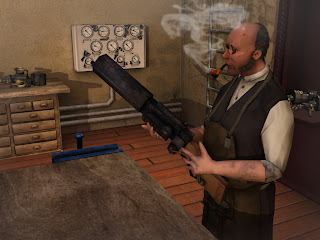
This scene will connect both characters (Teresa/Vincent) by showing the armour and weapons being built in the workshop by Vincent, which I feel will be a great way to end the project.
So at this point I have been busy planning out a final render scene as part of my project extra content work.

April 12 2010 (Vincent's hair)

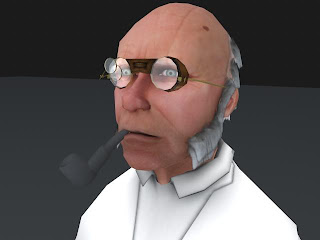
I have been looking over my recent renders of Vincent and I am not happy with the look of his hair. I feel that the quaity of the hair can look better, plus I still have lots of triangles to spend on this character and I will add more detail to his hair


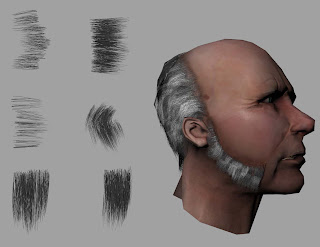
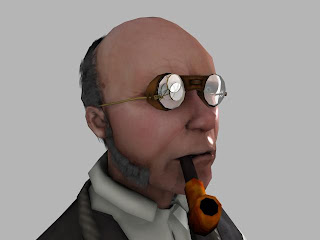
Above is examples of the improvements made to Vincents hair, which look more believable.


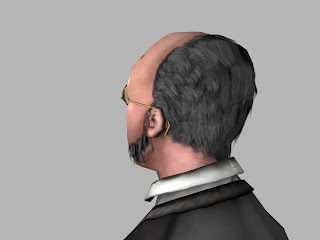
I am very happy with Vincent's hair and I will begin the rigging process.


April 19th 2010 (Building the final scene)

At this stage I am getting very close to the end of the final year, I want to make this final workshop scene so I will be multi tasking work on the final scene with working on my model book.


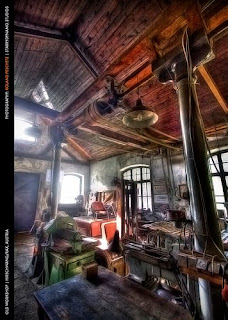
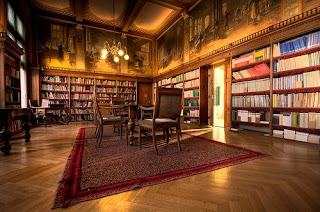
Before building the worksop scene I put together some refernces of how I would like the scene to look which is a conbination of an old workshop and classic library.


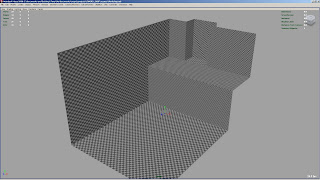
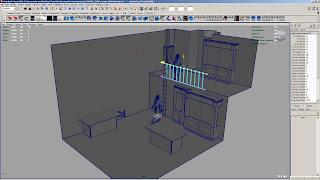
After researching what I want in the scene I started to build the scene in Maya and UV unwrap all the assets that will go into the scene. I used Vincent as I measuring for all the assets to get the correct size of each object and when this was done I imported the rigged version of Vincent into the scene.


April 25th 2010 (Final Render)

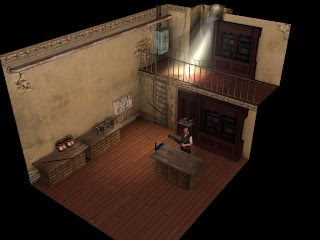
Below is one of the final renders of Vincent in his workshop environment, which is the end of this project for my degree course, however this idea has lots of potential and I will continue some future developments.


Final scene: CS3, Zbrush and Maya

Thursday 1 April 2010

Date: March 21st 2010 (Vincent)

All of the sculpturing detail has now been transferred to maps for the low polygon version of the model and now it is just a matter of finishing the textures.
When texturing a character, I like to start with the head then work on textures for the body, this will avoid working on areas like the hair which needs lot of tweeking at a later stage in the process.


At this stage I was trying to get the skin to look right this was quite a challenge because I had to imagen what the environment of his workshop would be like and the effect it may have on his skin. Vincent may work long hours through the night on his inventions so he might rearly shave or he may have night shadow around the eyes from the lack of sleep.


The hair still needs some tweeking.

Tuesday 30 March 2010

Date: March 17th 2010 (Change of plan)

Now the main part of the project is out of the way I could continue to create another version of Teresa for Unreal tournament 2004, but I feel that it is not necessary to continue making another version of Teresa at this point because the growth process of making the PSP PS2 then PS3 version has been broken.
So what I plan to do is fall back onto Teresa’s story and bring forword another character, which will help me demonstrate skills which I have used to create Teresa.

I felt that it would be obvious to create the bad guys of the story which I would like to create as mod character in future development, maybe for the Black Legion faction of UT3.
So I decided to create the head engineer of Teresa’s scientific team which I felt would create a stronger story for Teresa.

The engineer character will not be imported into the Unreal 3 engine for this character I will just create some nice renders using Maya and show case this character.
The reason for not importing this character into Unreal is that he will not fit into the theme of Unreal 3, my first character Teresa fits into the theme because she look as if she is in a war zone. After delivering my package to the Epic forums I realised that I got three stars for my character which is what I was expecting because the idea of my character was different from the usual characters that people create for Unreal.
Teresa was not the typical busty war babe with hardly any armour covering the vital parts of her body, so I feel that the design lost out on stars because of this.
In my future developments I would like to test this theroy and creating a typical Unreal character just to see if more stars are awarded to the typical character.
Anyway back to the development of my new engineer character and here is some of the work I have done recently.

I started out with a simple low polygon mesh.

I used sub divide to see how the model will look with more polygons.


I started to unwrap the UV of the characters head and body. (Spacing of the UV's need sorting).

Low polygon assets are imported into Zbrush for sculpturing.

Date: March 10th 2010 (UT3 Package)

I have delivered my package files to the epic community by using a download link for rapid share.com, users may have to wait 30 seconds before they can download the package for free which I feel is a short time to wait for downloading a top quality character. In response to my post which advertised my character a few people gave me some feed back about some errors with my package. The errors is the PS3 action cam Mutator which works fine on my PS3 console but other users are experiencing problems with the file, so tested this out on other PS3 consoles and the file was not working.
After finding this out I have downloaded another file which is work perfectly with all PS3 consoles. The other problem which was suggested by a user was that it takes long for users to download the package files and some people will give up waiting for 30 seconds before downloading. At this point in the project I feel that it is not priority to back track on minor mistakes, however I will fix any problems in future development.


If you would like to use the action cam for PS3 please click on the action cam link and follow the instructions to install the file onto the PS3.

Sunday 7 March 2010

Date: March 5th 2010 (character packages)

I have now completed the PC version of my character I can move on to setting up a folder which will contain all the necessary files in order to share this character with the Epic community.

In my last post I mentioned that I would create team skins for my character so that it is more obvious what side Teresa is on when users are playing Team Deathmatch, but this was only an optional decision and not part of my main project.

last night I spent a few minutes playing as Teresa on different team games, it came to my attention that adding team skins was not priority because users can see team colours due to a glow which surrounds each player on the battlefield .

Teresa from a far distance.


The lights of Teresa's gauge on the right arm and engine pack will glow with the colour of her team.


In addition to my character package I had another idea to include Teresa’s arms for first person perspective but in the same manner as the team skins I felt that it was only optional and not the main purpose of my project.

Frist person perspective arms will be put into the package file some time in the future.


At the beginning of the first year before I had the idea to use Unreal Tournament 3 (UT3) I wanted to create my character for Gears of War (GOW) which uses the third person view of characters.

This was much more appealing to me because the character is constantly in front of the camera, the camera will also move closer towards the character when their back is against the wall and users can see the detail that has gone into the model.

Not forgetting my first idea to create a character for GOW.


From talking to users on the GOW forum they suggested that I should create a character for UT3 before creating a character for GOW so that I can gain experience in Unreal Editor and understand the process better.

Within UT3 the camera can be changed to third person view by pressing the tab key and typing “behindview” during game play but when users are killed, they will need to type it again which is very frustrating.

I found out on Epic forum there is a patch that will change the first person view to third person view for both formats (PC/PS3) so I found the files for both formats and I will include them in each package folder.

Also during this time between my last posts I have been trying to convert my character package from PC to PS3 and it was giving me lots of problem to get the PS3 package working correctly. I kept going through the process over and over again but I couldn’t get it working.

I check over everything and I think the problem could be in the script, at this point I was clueless on how to fix it so I asked around on the Epic forums.

My cry for help grab the attention of a senior member of the forum called euchreplayer23 who really spent some time with me to help solve the problem and eventually he fixed my character script so that I can re-cook the package for PS3.


“Big thanks to euchreplayer23”


I have now finished both packages so please find the download link for both formats on the right side of this blogger page.

(This is a link to my post on Epic forums advertising my character)

http://forums.epicgames.com/showthread.php?p=27180303#post27180303


Monday 22 February 2010

Date: Febuary 20th 2010 (character completed)

Over the weekend I textured the final parts of my character outfit and added the textures to the Unreal model. At this stage the only things I need to sort out, are the team skins and the package folder.
When the folder has been completed I can then release my mod character to the Epic community.

Teresa is quite difficult kill and she loves finding this weapon and blasting me in the back or maybe I'm just crap at using the keyboard and mouse functions of unreal.

Date: Febuary 13th 2010 (Ingame)

In my last report I learnt a few valuable lessons on how to prepare my characters rig for Unreal, I lost some production time by having to learn from my mistakes, but next time I will not make the same mistakes and now I am more confident in transferring characters into Unreal from Maya.

At this point in the project I wanted to make sure that I have the characters mesh working properly in the game so I used the characters ambient occlusion map for the diffuse color just to test everything out.


At this stage everything checks out just fine the movement of the character is great and I feel that I can move onto texturing the rest of the character starting with the head section.


(At this stage her facial expression needs adjusting)

After completing the texture for the characters face, I updated the Unreal textures just to see how it would look in Unreal. Now that the texture was on the characters face I noticed a few simple things that needed tweaking, like the mouth area was very wide and in the texture I painted too much dirt on her face so I reduced the amount of dirt to show more of her face.

Her facial expression looks more natural and I textured some of the body to test out the color of her uniform.


So far I’m really happy with the texturing on the characters face and I think it looks great in the game engine so I now feel confident enough to get on with texturing the rest of the body.


Work in progress so far (19/02/2010)

Sunday 31 January 2010

Date: January 30th 2010 (Debuging problem)


I will fill in some details later, but at the moment I need some help with UT.

Following on from the above comment:
Over the past few days I have been trying to work out what has gone wrong with my character mesh, why does my character mesh work perfectly in Unreal Editor, but in the Unreal game parts of the mesh is out of place.


Another problem is the character is facing the wrong direction ingame even when I change the settings within Unreal Edit (coordinates Z -50,000) the results are still the same.

So at the moment I have been gathering all the information I can find for Unreal Editor and I have been doing some reseach into how this problem can be fixed.

Before I explain what as has gone wrong, here is a breakdown of my workflow up to the point where I was having trouble with the in-game character mesh.


Maya:
1. I created the character in Maya 2008 and separated the mesh into 5 parts (head, torso, arms , legs and boots).
2. Each part has its own name e.g. L_arm, R_arm and so on.
3. Make sure that Maya’s world coordinates are set to Z.
4. Make sure that the centre point of each mesh is in the centre of the grid.
5. Create a rig for my character and move bones to fit inside of the mesh.
6. Freeze transformation to all mesh parts and delete history before Smooth bind all parts to rig.
7. Use the smooth tool to add weights to the correct areas of the mesh and test the mesh by moving the bones of the rig.
8. Save file before deleting each part of the mesh, leaving only the part that will be transferred.
9. Open actor X version 2.47, set output file and name character parts e.g 1Teresa_head.

Unreal Editor:
1. When all of the parts have been imported into a new package with normal and diffuse maps assigned to a material instance constant in Unreal Ed.
2. Set all of the sockets to the correct places.
3. I quickly tested the animation in Unreal ED with default animations “work’s flawlessly”.
4. Open UTCustonChar.ini file and input your character script details.
5. Run Unreal Editor and find character in customize settings.


Okay from reading lots of useful information provided by my tutor/mentor, the internet and not forgetting the Epic community.

One of the main warnings in all of the information was “DO NOT MOVE OR SCALE RIG” in big bold letters.

Yep, I totally messed about with the rig then tried to import it into Unreal and I did this because it was much easier to move the parts of the model then use the smooth weights tool to assign the mesh to the correct places.


This is something I learnt to do in Maya when rigging a character so that when the character bends her leg she will have a nice fold behind her knees.
Also before adding the weights I moved the position of the rig and scaled some parts of the rig into position, unaware that it will cause major problems further down in my production stage.

So why did my mesh work in Unreal editor?

Well I conducted some simple experiments in Unreal Editor to find this out and what I did was import a model with Y coordinates as world up then used a default animation in Unreal ED and
everything worked fine.

Some the information provided did mention that Unreal Editor can show different result in comparison to the Unreal game.

However if this model was imported into Unreal game the character mesh will be under the ground and not visible to the third person camera.